Thursday, April 28, 2022

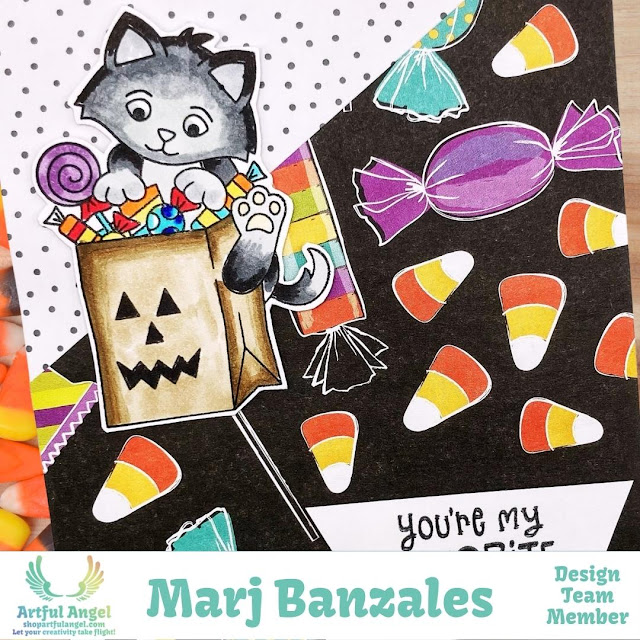
Newton's Nook Trick or Treat Kittens


Do you love trick or treating on Halloween? Well today, it's trick or treat kittens on Halloween. Isn't that cute?

Hey friends! This is DT Marj and I'm glad you are here again. Today I have another project inspiration to share with you and it's the Newton's Nook Trick or Treat Kittens. This is available over the Artful Angel website.

So let's get started...

  1.  Cut an A2 white blank card and cover the front with pattern paper. Cut another piece of pattern paper and cut a piece of it and adhere it to the front of the card.
  2. Stamp the Treat Kitty onto white cardstock using Color Hive Eclipse Black ink and color with Arteza Ever Blend Ultra Art Markers. Start with dark colors and build up to light colors. Fussy cut the image leaving white borders around it.
  3. Cut strips of cardstock, then adhere them to the back of the image
  4. Stamp the sentiment onto white cardstock with Color Hive Eclipse Black ink and trim to size and cut both sides with a fishtail. Cut strips of white cardstock, put them together, and adhere them to the back of the sentiment. 
  5. Add the image on the top left side and adhere the sentiment to the bottom right side and the card is finished.


I hope you like my card and give it a try to make your own. 
Be sure to check the new stamp sets over the Artful Angel website and simply use my coupon code MARJBANZALES and take advantage of 10% OFF.

Thank you so much for stopping by and I'll see you again next time!!!
Marj


Wednesday, April 27, 2022

POPPIN BY!!!


POPPIN BY!!!!


Good afternoon this is KERRI and I am a DT member.  Today I am sharing a card I made using the new stamp set called POPPIN BY!  This cutie is SAVANNAH and she is a new addition to ARTFUL ANGEL.  Along with SAVANNAH there are five sentiments that can be used on the back of your cards  or on the front if you wish.  
For this card I created the background with ins and a stencil.  I them stamped the image onto white card stock with Memento Tuxedo Black Ink.  I proceeded to color the image with Prisma Pencils.  The sentiments are included with the image and once it was all adhered down I added a few dots.  Thanks for stopping by
HUGS

KERRIDT


Tuesday, April 26, 2022

Newton's Nook Rainy Day Trio

 Hi angels!  DT Kim here to share this ridiculously fun card that I made with the adorable Newton’s Nook RainyDay Trio stamp set.   When I saw these stamps, I knew that I had to create a card that rains!   I am not going to lie, this card was a bit frightening to take on, and it was a labor of love, but it was honestly pretty easy!  This post is a bit long, but if you hang with me to the end, there is a fun GIF showing the motion in this card. 

I colored the main image using Copics and I ink-blended my background pieces using Distress Oxides (all colors listed below).  I die-cut several cloud layers using the Lawn Fawn Puffy Cloud Borders Dies and I also inked them up with Distress Oxides.  I colored a strip of card stock and heat embossed the sentiment and music notes in black.  I set all of these elements to the side and got to work creating the rain.

I cut 9 lengths of fishing line and I tied knots in one end of each piece.  I then strung some glass seed beads on each piece and tied a knot at the opposite end.  I used 15 beads on each piece, but this will depend on the size of the beads that you use.  It equaled about 1” of beads.
I adhered my ink-blended background panel to my card base and I laid foam tape across the top and the bottom.  To determine placement, I marked where the bottom of my clouds and the top of where my bottom border would be with a pencil.  For the top of the card, the foam tape should be above the pencil line, and for the bottom, the foam tape should be below the pencil line.  I peeled the backing off of the foam tape and I stretched one strand of the beads across the center of the card, top to bottom.  As long as the knots are above and below the tape lines, they don’t matter, as you will be cutting them off. I added the rest of the strands of beads, working from the center out to the sides.  Once the beads were in place, I added another strip of foam tape over the foam tape already laid down.  This will hold the beads in place.
I placed a sheet of acetate over the card front and then I adhered the clouds to the top, the hill to the bottom and the colored image to the front using liquid glue. To finish the card, I trimmed the sentiment strip and fussy cut the musical notes and placed them on the card front.

Colors Used:

Copics:

Greens – G07, YG25, YG11, YG00

Purples – BV08, BV04, BV02, BV00

Pinks – RV09, RV06, RV04, RV02

Tan Cat – E25, E33, E53, E50

Orange Cat – YR24, YR23, YR21

Grey Cat – C6, C5, C4, C2

All cats – RV00, RV000

Distress Oxides:

Background - Twisted Citron, Peacock Feathers, Faded Jeans, Chipped Sapphire

Clouds – Weathered Wood, Speckled Egg, Broken China


Thanks so much for hanging with me!  I hope you love this card as much as I do!
Make sure to hit the shop to pick up this cute stamp set and use coupon code: KIMSIMPSON to save 10%!   

Happy crafting!  Xoxo, Kim


Monday, April 25, 2022

Savannah - Popping By!

Hello angels!  DT member, Kim, here and I can't even begin to tell you how excited I am to share this project with you today!  Artful Angel is launching their own stamp line today and I am so honored to be able to participate and introduce you to Savannah the Sloth!   Popping By is the first Artful Angel stamp set to be released, but there will be more Savannah to come soon!   

For my card, I colored Savannah with Copic markers (colors listed below) and cut her out.  I adhered a panel of Stampin' Up's Pattern Play DSP to a panel of white card stock.  Using the Circle Dies from C.C. Designs, I die-cut a circle from the panel. I popped this panel up on my card base using foam squares, and I placed a navy circle inside. I then adhered Savannah so that she appears to be popping out of the circle. 
I heat embossed my sentiment in white and die-cut it using Stampin' Up's Tasteful Labels Dies.  I also die-cut  a scalloped circle and several hearts with the die that comes in the Circle Dies set and adhered them to the card-front.  I then attached Savannah so that she appears to be popping out of the circle. 

Colors Used:

Grass:  G07, YG25, YG11, YG00

Savannah:  W7, W5, W3, N2, N0, R20

Flowers: Y17, Y15, Y11, Stampin' Up Misty Moonlight Dark/Light

I don't know about you, but I can't wait to see what other shenanigans Savannah gets up to in the future! 

Make sure to come over to the Artful Angel Takes Flight Facebook Group and check out the other amazing Design Team inspiration!  On May 7th, I will be hosting a Mystery Craft Along in the group.  It is sure to be a fun time and we will be creating a fun-fold card using Savannah!  All the details will be coming soon!  

Thanks so much for stopping by! 

Xoxo, Kim


Savannah Playing Peek-a-Boo


Hi everyone! I'm Linh (@LVHandcrafted) and today I have a new video on my YouTube Channel. Have you seen the new stamp sets by Artful Angel? Isn't it awesome that our favorite craft shop now has its own line of stamps?  Here's a fun peek-a-boo card featuring Savannah the Sloth!  


If you like my tutorials, consider subscribing to my YouTube channel.


-----------  PRODUCTS FEATURED IN THIS VIDEO  --------------

Use coupon code LVHC10 to get an extra 10% off!

  ** Popping By - https://bit.ly/3MbZOsR


** DISCLAIMER: Some products were provided to me for free to create & share inspiration. Everything else I purchased. All designs and opinions are my own and in no way influenced by the provider of the products.


Friday, April 22, 2022

C.C Designs Mermaid Party!


Hey there today I am sharing a card I made using a set called Mermaid Party. I absolutely love this set..The images are ADORABLE.. I also used the set called C.C Designs Underwater Scene.  First step I created the background with Distress Inks and a Stencil.  I proceeded to stamp out the images onto White Card Stock with Memento Tuxedo Black Ink.  Using Versa Mark Embossing Ink I stamped out the saying.  I then took White Embossing Powder and my Heat Tool.  I colored with Prisma Pencils and put all of the elements together.  Thank you for stopping by..

KerriDT 


Thursday, April 21, 2022

Coffee or Chocolate - Kraftin' Kimmie Stamps


What do you like to drink Coffee or Chocolate? As for me, I love to drink Coffee with Vanilla Caramel and no sugar but sometimes I like it with a lot of sugar to wake me up!

Hello, lovelies! This is DT Marj of MarjBanzalesDesigns. Today is my first post here on the blog as a Design Team Member.

My project for today is all about coffee or chocolate and I used the Coffee or Chocolate Stamp Sets of  Kraftin'Kimmie Stamps and they are available over Artful Angel Website.


To simply make this card:

  • Stamp the coffee cup and the buns onto white cardstock, color them using Arteza Ever Blend Ultra Art Markers then fussy cut them leaving a white border all around them. Used Green gel pen to add shine to the cup.
  • Cut strips of small sizes of scraps and adhere them together and attached to the back of the image. This will create more lift and dimension. Then set them aside.
  • Create an A2 side fold card base from light blue cardstock.
  • Cut a piece of designer paper measuring 4.25 x 5.25 inches and attached it to the card base.
  • Die-cut the scalloped rectangle open panel from White cardstock with a stenciled design on the side and adhered to the front of the panel.
  • Cut the doily in half and attached it to the bottom of the card.
  • Using strong glue, adhere the image to the front of the card and let it sit for a bit to dry.
  • Stamp the sentiment onto white cardstock. Trim to size then attach to the top front center using strong glue. 
  • Add a few small pearls here and there and the card is done.


  • I hope you like what I made today and you learn a thing or two.

    Thank you for stopping by and I'll see you again next time.

    For more project inspiration, feel free to check Artful Angel Facebook Group and IG account.

    See you next time!!!

    Marj


    Let’s connect here:
    BLOG: https://marjbanzalesdesigns.wixsite.com/marj
    INSTAGRAM: https:///www.instagram.com/marjbanzalesdesigns/
    FACEBOOK: https:///www.facebook.com/marjbanzalesdesigns
    PINTEREST: https://www.pinterest.com/marjbanzalesdesigns

    Wednesday, April 20, 2022

    Have You Heard?? Artful Angel Is Releasing Our VERY OWN Line Of Stamps!!

    Good morning! Who's ready for Sneak Peeks of the NEW Artful Angel stamp line!?! I'm so excited to be sharing these Sneak Peeks with you!!
    Be sure that you are a member of the Artful Angel Takes Flight Facebook group & be watching for Sneak Peek posts throughout the day today, tomorrow, & Friday. You don't want to miss out on these because there WILL BE winners!! If you aren't a member of the Artful Angel Takes Flight Facebook group, it's simple! Just hop over to the page, answer ALL the questions, your request will be accepted, & you can make your guess. Maybe you will win!!

    Tuesday, April 19, 2022

    Newton's Nook Knead Kittens

    Hi angels!  DT Kim here to share this card made with the adorable Newton’s Nook Knead Kittens stamp set. 

    I had a ton of fun creating this card.  The images in this stamp set are just adorable.  I colored up the image with Copics (colors listed below) and then fussy cut the image and set it aside.
    I decided that I would pair kraft card stock with some Stampin' Up Flirty Flamingo card stock.  I die-cut a heart using the Sizzix Framelits Die Set and I inked up the edges of the heart with Saltwater Taffy Distress Ink.  I die-cut a card panel from each using the Stitched Rounded Rectangle Dies from Elizabeth Craft.  I inked the edges of both panels using Vintage Photo and Saltwater Taffy Distress Inks.  

    I used the small stamps in the stamp set to create my own background.  I inked them up with Versamark ink, which is a ton of fun, as it creates a watermark and takes on the same color as the paper you are stamping it on, just a shade darker.  I heat embossed the sentiment onto the heart and adhered all of the layers to the card base.  I wound some baker's twine around my fingers and placed it on the card front, and then I popped my image up on foam dots. 
    Copics Used: 

    Cat:  E25, E33, E53, E50, RV21, RV000

    Bread:  E18, E15, E13, E53, 51, E50

    I hope that you have found something that inspires you to get crafty!  

    Make sure to hit the shop to pick up this cute stamp set and use coupon code: KIMSIMPSON to save 10%! 

    Xoxo, Kim

    **Affiliate links have been provided at no additional cost to you**


    Monday, April 18, 2022

    Springboarding From a Sketch


    Hi everyone! I'm Linh (@LVHandcrafted) and today I have a new video on my YouTube Channel. I started out using the Monthly Sketch Challenge over on our FB page in an attempt to show how you can loosely interpret the sketch. However, once I got going, the card quickly evolved away from the sketch, which is why sketches are fantastic! They offer a great way to get started and springboard from.


    If you like my tutorials, consider subscribing to my YouTube channel.


    -----------  PRODUCTS FEATURED IN THIS VIDEO  --------------

    Use coupon code LVHC10 to get an extra 10% off!

      ** Captivated Kitten - https://bit.ly/3qHlJzM

    ** DISCLAIMER: Some products were provided to me for free to create & share inspiration. Everything else I purchased. All designs and opinions are my own and in no way influenced by the provider of the products.


    Sunday, April 17, 2022

    Have you joined the April Sketch Challenge yet? Stamping not required!

     Hey friends!  DT Kim here.  Can you believe that we are halfway through the month already?   This is your friendly reminder to get your cards in for our new Monthly Sketch Challenge.  

    What's this, you ask?  Let me tell you!  The Design Team is bringing you a monthly sketch challenge over in the Artful Angel Takes Flight Facebook Group

    The April Sketch was taken from Mojo Monday by Julee Tilman.  It is designed to give you a starting point and get those creative juices flowing! 

    I decided that because I had so much fun creating with this sketch, I would make another card, this time with no stamping!  
    This card was so quick and easy to put together.  I used the Echo Park Let's Lumberjack 6 x 6 Paper Pad.  Once I determined which pieces I wanted to use, I applied Vintage Photo Distress Ink to the edges of the papers with an ink-blending tool.  I also lightly ink blended over the kraft card stock to add some interest.  The sentiment is actually just a small piece from one of the paper pad pages, which I popped up on foam squares.  I finished off the card by adding a bow made from black and white baker's twine.  Seriously, the hardest part of creating this card was trimming down the pieces of paper.  Did you know that you could create such a cute card with no stamping? 
    Now, back to the challenge!   The last day to enter is April 30th.  There are no product requirements to participate.  Oh, did I mention the prizes? For the rest of the details, make sure to pop on over and check out the pinned post in the Facebook group
    Here is some additional DT inspiration: 
    Dalis
    Kim
    We sure hope that you will join us over in the Facebook group for this month's challenge and more inspiration! 
    Xoxo, Kim


    Saturday, April 16, 2022

    Thank you GOURD-geous!

    Hey, everyone! Here to bring you a kind of unusual card!  I love having extra uses for my stamps, especially unusual uses, that turn into PUNNY cards. I think PUNNY cards are my favorite, they are quirky and unexpected!


    Here is a picture of a close-up of the main image on my slimline card. I watercolored the gourds with some super shiny metallic watercolors and then overstamped them with Versamark ink and heat embossed in gold. Lots of splattering of gold in for the background. Get all those alphabet dies to use and make your PUNNY saying! All the letters and the banner were cut from white cardstock and color blended with some of the inks that are part of my stash.


    Friday, April 15, 2022

    Socks C.C Designs

     Artful Angel


    Hey there this is Kerri checkin in with you all.  I am also sharing a card today that i made using a Stamp Set from C.C Design that is currently in the Shop.  The set is called SOCKS.  This set is super cute and could be used for any occasion.  

    To make this card I stamped the images onto White Card Stock with Memento Tuxedo Black Ink.  The background was created with Oxide Inks and a Stencil that was similar to a knit pattern.  Images were color with Prisma Pencils and I added some Die Cuts and Sequins.  I hope you are having a great day take care and be safe..

    HUGS KERRI

    Tuesday, April 12, 2022

    One Stamp Set, Three Cards and a Bonus!

     Hi crafty friends!  DT Kim here to share with you my creations this week!  I was inspired by a blog post by the amazing Norine Borys (@thevelvetlemon) about making use of mini stamps.  While I really love small stamps (and have a HUGE collection of them), I find that they often just sit on my shelf, as I never know what to do with them.  I decided that I would challenge myself to make good use of the cute little stamps in the Kraftin' Kimmie Holiday Bears stamp set. 

    To start, I stamped all of the images and colored them with alcohol markers.  I used a combination of Stampin' Blends from Stampin' Up (because I wanted the colors to coordinate with my card stock, and my selection of blue Copics is a bit limited) and Copic markers.  The colors will be listed below. 


     For the first card, I used the Stitched Indented Rectangle Dies from Elizabeth Craft Designs to die-cut the panel for my image.  I then stamped my image and sentiment and then colored the image.  I die-cut another panel using the next largest die in the set.  I adhered them to a panel from the Echo Park Winter Magic 6 x 6 Paper Pad.  To finish, I added a bow made from silver metallic thread. 
    For the second card, I stamped my image in the lower corner of a 3 3/4" x 5" panel of white card stock and colored it.  I stamped the sentiment on the panel.  I embossed the snowflakes from the stamp set in a mostly random fashion, using WOW Vintage Peacock Embossing Powder.  To finish, I layered it on a panel from the Carta Bella Winter Market 6 x 6 Paper Pad
    For the third card (which just might be my favorite), I embossed the sentiment in white on a scrap of Navy card stock and trimmed it down.  I had an extra die-cut from a different card that I made that I layered behind the sentiment tag as a snow drift in order to ground my image and not have the little cutie "floating".  I used a piece from the Carta Bella Winter Market 6 x 6 Paper Pack for my background and then layered up my elements.  
    Oh, yeah!  Did I mention that I had a bonus card for you?  Well, I do!  I recently purchased the new Lawn Fawn Platform Pop Up Dies and had so much fun making a birthday card for my hubby that I wanted to try again, and I thought that these little bears would be PERFECT to create a scene with!   The fun thing about this die set is that after it is assembled and decorated, it folds flat and fits in an A2 envelope. 
    I colored and cut out all of the images from the stamp set and set them aside.  I used one of the designs from the Carta Bella Winter Market 6 x 6 Paper Pad for the base of my card.  Once I had my card assembled, I started playing with the placement of the images until I was happy and then I adhered them in place with liquid glue and embellished the outside of the card.  I love how it turned out!  
    Colors Used:
    Bears:  N2, N1, N0, R30, R000
    Bear Outfits:  Stampin' Blends (all Dark and Light) - Night of Navy, Misty Moonlight, Seaside Spray, Balmy Blue
    Sled/Snowshoes:  E18, E15
    Birds:  E51, E51, YR04
    Snowballs:  BG11, BG10, C1, C0, 0
    Spectrum Noir Sparkle Pen
    This is all four of the cards together.  This was really a quick and easy effort and I now have 4 cards ready for winter!  I hope that you have found something that inspires you to get crafty and maybe try to tackle something that may have been a struggle for you!  
    Thanks so much for hanging with me!  
    Xoxo, Kim
    NOTE:  This post contains affiliate links at no cost to you. 


    Monday, April 11, 2022

    I Am The Walrus Sketch Challenge Card


    Hi everyone! I'm Linh (@LVHandcrafted) and today I have a new video on my
    YouTube Channel. I'm playing along with our Monthly Sketch Challenge over on our FB page and a fun stamp set from Sweet Sentiments.  Enjoy!


    If you like my tutorials, consider subscribing to my YouTube channel.


    -----------  PRODUCTS FEATURED IN THIS VIDEO  --------------

    Use coupon code LVHC10 to get an extra 10% off!

      ** I Am The Walrus - https://bit.ly/3wI1nu6 

      ** Monterey Bay - https://bit.ly/3Lps4Iq 

    ** DISCLAIMER: Some products were provided to me for free to create & share inspiration. Everything else I purchased. All designs and opinions are my own and in no way influenced by the provider of the products.


    Saturday, April 9, 2022

    'Ahoy Matey

    Hi Everyone! Dalis here, I get to share this cute card with you today. It uses the 'Ahoy, Sailor' stamp from Kraftin' Kimmie.


    You will learn that I love making my own little backgrounds. I wanted Lucas to be on a ship sailing the old sea. I created this scene with just a bit of kraft-colored paper, my scoreboard, and ink. For the sea, I used dark blue cardstock and a very old pair of micro scalloped scissors. Lucas was stamped in Bristol Smooth paper and colored with markers and colored pencils. The stitched blue heart is from the C.C. Designs Circles Die.
    Last, I wanted to give you a close-up looik to the coloring on the card. I really love how Lucas turned out!
    NOTE: This post includes affiliate links at no extra cost to you.